How to create a Lesson using the Match and sort Component?
You can use this component to have your students match or sort the answers by dragging them to the relevant placeholders. This will give the users evaluate their knowledge effectively in an interactive manner.
You can use this component to create 2 types of questions.
1. Drag and drop matching Questions: The user will drag and drop the boxes with answers to relevant place holders to match them with the questions.
2. Drag and drop sorting Questions: The user will drag and drop the boxes with answers to relevant place holders to sort them
When to use this Component
You can use this component when you want to let your students match the answers to their corresponding questions. With this same component, they can sort the given answers by dragging them into the respective placeholders.
How it works
-
User can match or sort the boxes with answers on the right side by dragging them to the respective placeholders.
-
The user clicks the Submit button.
-
If the user has matched or sorted all the answers correctly, they will be highlighted in green. The Final Feedback is shown in the grey panel at the bottom of the page. The Submit button disappears.
-
If the user hasn’t matched or sorted all the answers correctly, the wrong answers will be shown in red. The First Attempt Feedback is shown in the grey panel. The Submit button turns to Retry.
-
The user clicks the Retry button. All the boxes are reset to their initial places. Retry button turns to Submit again.
-
The user clicks the Submit button and matches or sorts the answers. If the user has matched or sorted all the answers correctly, they will be highlighted in green. The Final Feedback is shown in the grey panel at the bottom of the page. The Submit button disappears.
-
If the user hasn’t matched or sorted all the answers correctly, the wrong answers will be shown in red. The Second Attempt Feedback is shown in the grey panel. The Submit button turns to Show.
-
The user clicks the Show button.
-
The boxes are shown correctly matched or sorted. Final Feedback appears in the grey panel.
Features of this Component
-
You can place an optional heading for the page. The description text on the right side is also optional.
-
The First Attempt, Second Attempt and Final Feedbacks are also optional.
-
You can place an optional divider between the Description texts and boxes.
-
You can easily switch between matching and sorting just by clicking a checkbox.
-
You can easily design your draggable boxes and placeholders and assign the correct answers.
-
The boxes align themselves automatically and they are all in the same width and height.
-
The direction to drag the boxes is indicated by arrow marks.
The below are the initial common steps involved in creating a question with this component.
Step 1: Go to the required Slide
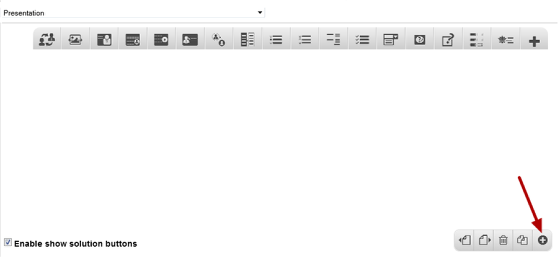
If you are creating a new Presentation, you will be taken to the first slide where you can use this component and create a page. Alternatively, if you want to add a new slide where you want to use this component, click on the '+' icon on the lower right corner as shown in the above image.
Step 2: Click on the Match and sort Component Icon

Then click on the Match and sort component icon as shown in the above image. You will see a screen similar to the image shown below.
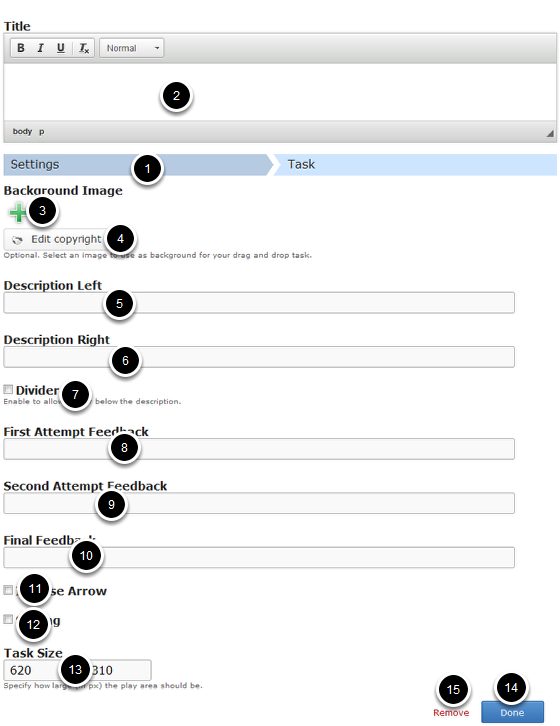
Settings [1] tab deals with general settings such as background image and size. The screen above shows the Settings tab of the Match and sort component. On this screen, you can
- Add an optional title in the Title [2] field. This same field will be visible in the Task tab as well.
- Add an optional background image to the page using the Background Image [3] title.
- Update copyright details of the uploaded image by clicking the Edit copyright [4] button.
- Add description texts to the Description Left [5] and Description Right [6] fields.
- Add an optional divider by checking the Divider [7] button.
- Update contents for the First Attempt Feedback [8], Second Attempt Feedback [9] and Final Feedback [10].
- Set the direction of the arrow by checking the Inverse Arrow [11] checkbox.
- Switch between matching and sorting by checking the Sorting [12] checkbox.
- Set the size of the task by updating it in the Task Size [13] text boxes.
- Click on the Done [14] button to save the changes.
- Remove the component by clicking on the Remove [15] button.
Once you’ve made the required changes on the Settings tab, move to the Task tab as shown in the below image.
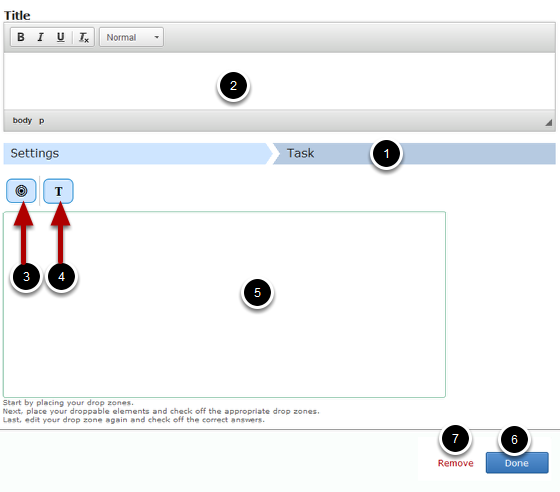
The screen above shows the Task [1] tab of the Match and sort component. On this screen, you can
- Add an optional title in the Title [2] field. This is the same field which was visible in the Settings tab.
- Add drop zones buy clicking the Drop Zone [3] icon.
- Add draggable boxes with answers or boxes with labels by clicking the Insert text [4] icon.
- Organize the boxes in the Background Area [5] of the task. If you've added any background image, it will appear here.
- Click on the Done [6] button to save the changes.
- Remove the component by clicking on the Remove [7] button.
Once you’ve added the component, you can create a question of any of the 2 types of this component mentioned earlier. You can check the documents for these 2 types to learn how to create a question of these types individually.